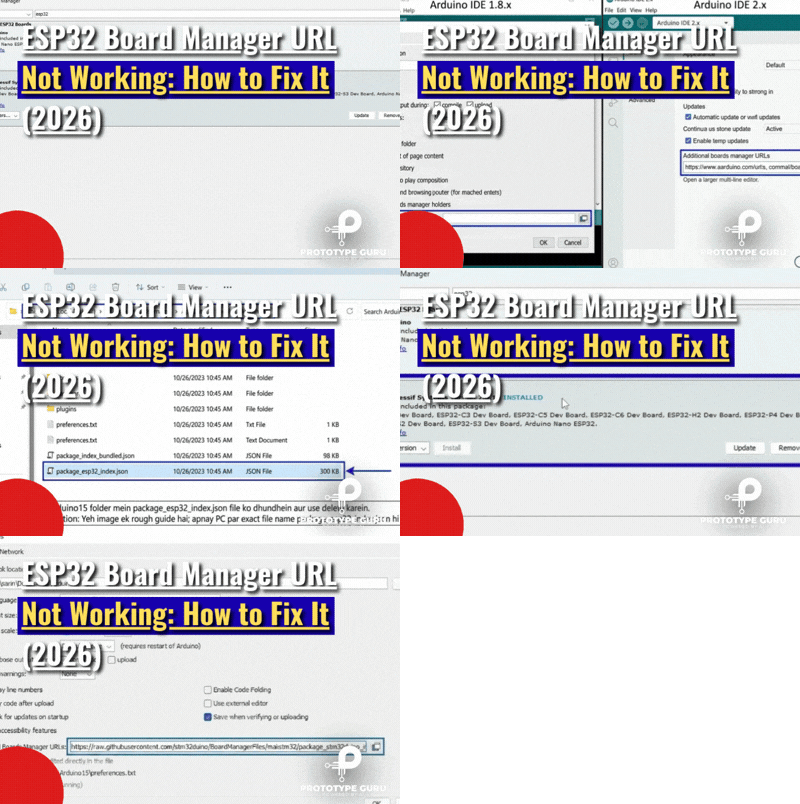





The ESP32 URL for Arduino IDE is the single setting that unlocks ESP32 support inside the Arduino software, and getting the ESP32 URL for Arduino IDE typed correctly into the right box is the first thing you need to sort out before you can compile a single line of code. If you’ve just unboxed a new board and the IDE seems to have no idea what an ESP32 even is, that’s completely normal, Arduino’s software only understands official Arduino hardware out of the box, so every third-party chip family has to be added separately through the Arduino Board Manager.
This guide walks through the full process of getting the ESP32 URL for Arduino IDE configured correctly, installing the board package, and running your first sketch, on Windows, macOS, and Linux alike. Along the way we’ll cover the Additional Boards Manager URLs field, driver installation for boards like the ESP32 DevKit V1 and ESP32 WROOM 32, and the upload errors that trip people up right after setup looks “done.”
If you’re on Arduino IDE 2.x, the Arduino IDE Preferences menu location shifts slightly from the classic 1.8.x layout, but the ESP32 board package URL itself doesn’t change between versions, only where you go to paste it.
Watch the Video Tutorial
Prefer watching over reading? There’s a video walkthrough covering the same ESP32 Arduino IDE setup steps below, otherwise, keep scrolling for the full written version.
Why You Need the ESP32 URL for Arduino IDE in the First Place
Here’s the part a lot of tutorials skip: the Arduino IDE doesn’t ship with a built-in database of every microcontroller on the planet. Instead, it relies on small JSON index files hosted by each chip manufacturer, and the Additional Boards Manager URLs field is where you register those files with the Arduino Board Manager.
Espressif, the company behind the ESP32, hosts exactly this kind of index, the official ESP32 board manager URL, published as package_esp32_index.json, and once you add it, the Boards Manager can pull down the full Espressif Arduino Core: compiler, upload tools, and every supported board definition, from the classic ESP32 Dev Module to newer variants. In short: the official ESP32 board manager URL points to package_esp32_index.json, package_esp32_index.json describes the Espressif Arduino Core, and the Espressif Arduino Core is what makes the ESP32 Dev Module appear inside your Arduino IDE Preferences-configured board list.
Before You Start: What You’ll Need
Make sure these are sorted first, since skipping any one of them is the source of most “it’s not working” messages later:
- Arduino IDE already installed, grab it from arduino.cc/en/Main/Software. Both the 1.8.x and 2.x branches work fine once the ESP32 URL for Arduino IDE is added, though a few older community tools (the SPIFFS filesystem uploader especially) haven’t made the jump to 2.x yet. Installing both versions side by side costs nothing if you think you’ll need that plugin.
- An actual ESP32 board, an ESP32 WROOM 32, an ESP32 DevKit V1, an ESP32-S3, an ESP32-C3, or any generic ESP32 dev board will all work with the steps below. The label on the board matters later when picking from the board dropdown.
- A USB cable that actually carries data, a lot of cheap cables bundled with power banks only carry power, not data, and no amount of correctly configuring the ESP32 board manager URL will make a port appear if your cable can’t transmit data.
Adding the ESP32 URL for Arduino IDE, Step by Step
Step 1, Open Arduino IDE Preferences
From the top menu, click File > Preferences to open the Arduino IDE Preferences dialog, this is the same screen where you’d change your sketchbook folder, but the field we need sits near the bottom.
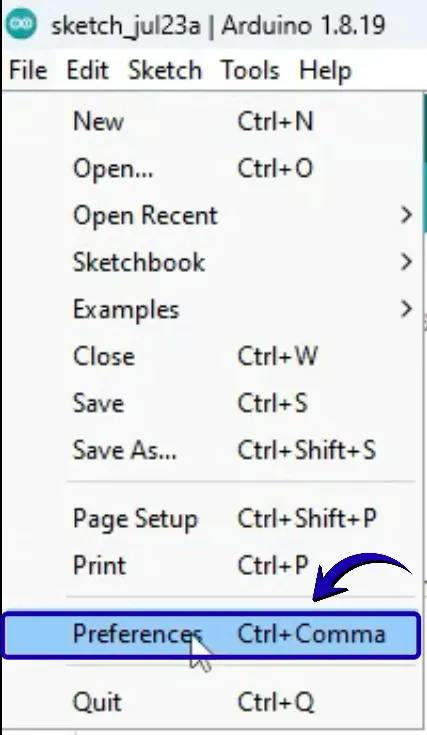
Step 2, Paste in the ESP32 board manager URL
Find the box labeled Additional Board Manager URLs and paste in the official ESP32 board manager URL:
https://raw.githubusercontent.com/espressif/arduino-esp32/gh-pages/package_esp32_index.jsonClick OK. That’s the entire configuration step for the ESP32 URL for Arduino IDE, one link, and the IDE now knows exactly where to fetch the ESP32 board package from.
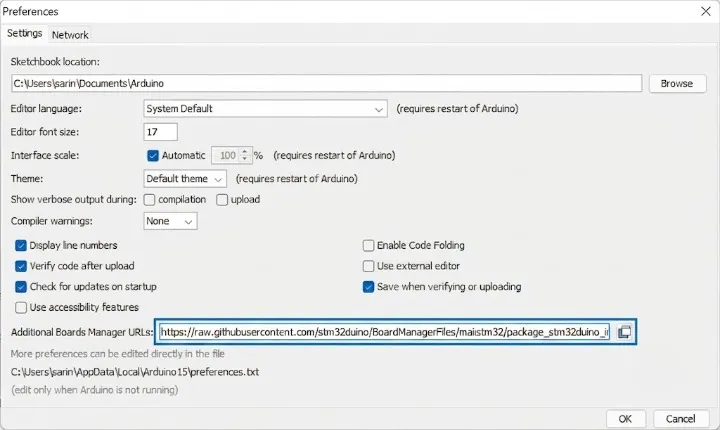
Already using the Additional Boards Manager URLs field for ESP8266 boards? Just separate multiple entries with a comma, the field accepts as many manufacturer index links as you need:
https://raw.githubusercontent.com/espressif/arduino-esp32/gh-pages/package_esp32_index.jsonhttp://arduino.esp8266.com/stable/package_esp8266com_index.jsonStep 3, Open the Boards Manager
Go to Tools > Board > Boards Manager… to bring up the searchable package list that reads from the ESP32 board manager URL you just added.
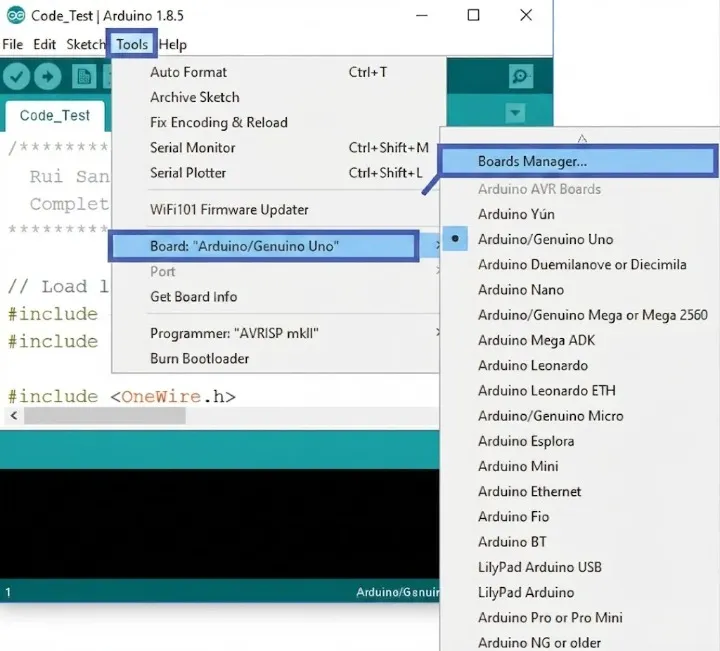
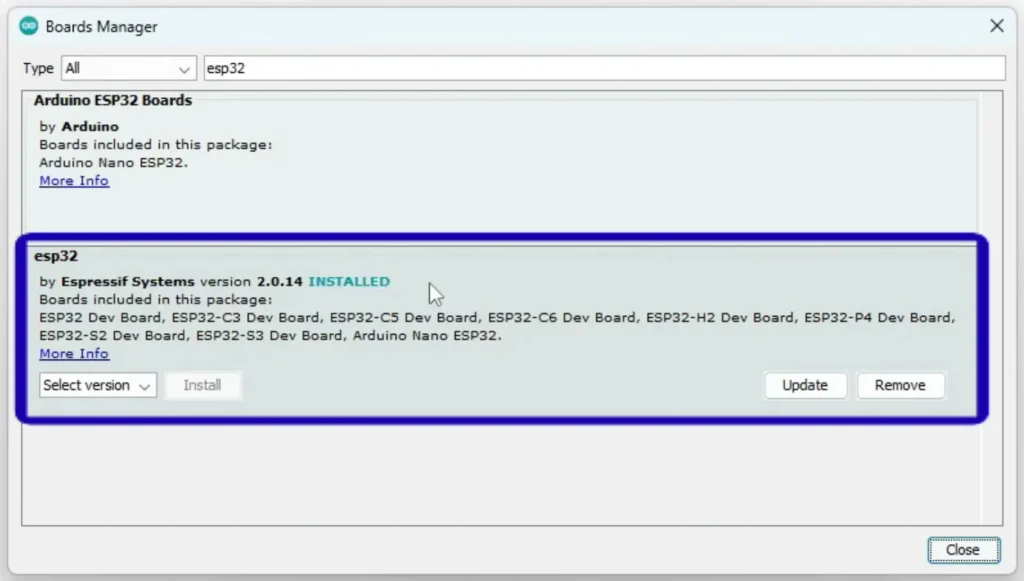
Step 4, Search for ESP32 and install the package
Type “esp32” into the search box and look for the listing published by Espressif Systems, click Install. If the ESP32 URL for Arduino IDE was entered correctly in Step 2, this listing appears almost instantly.
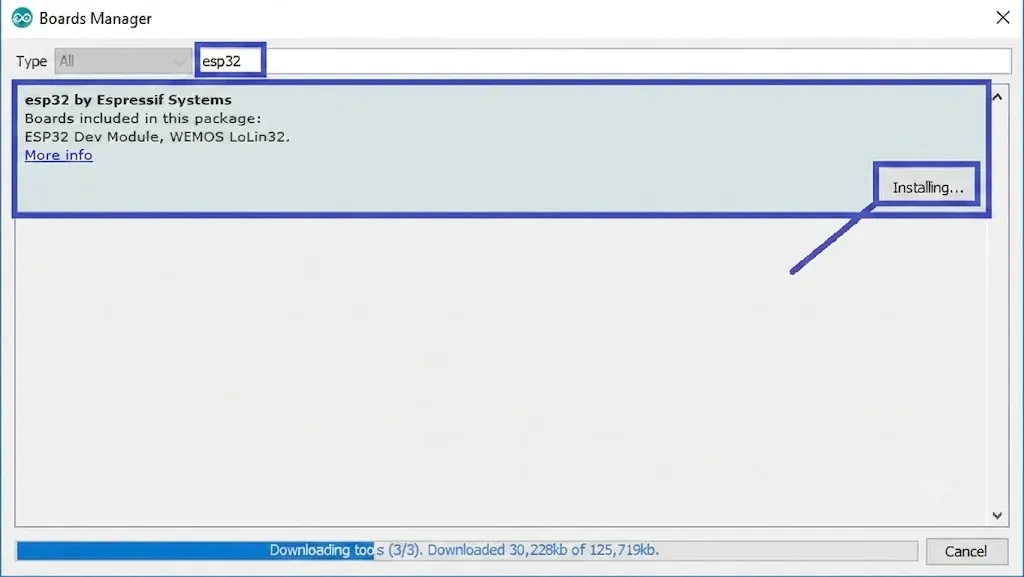
Give it a minute or two. This install isn’t just grabbing a small config file, it’s downloading the entire Espressif Arduino Core toolchain, so the download is noticeably bigger than a typical board add-on.
Step 5, Pick your exact ESP32 Dev Module and port
Head to Tools > Board, scroll to the ESP32 section, and choose the entry matching your hardware:
- ESP32 Dev Module, the safe, generic pick for most bare ESP32 WROOM 32 boards, including a standard ESP32 DevKit V1
- ESP32-S3 Dev Module, for the newer S3 chip variant
- ESP32-C3 Dev Module, for boards built on the RISC-V based C3
- NodeMCU-32S, if your board is explicitly branded this way
When in doubt, the ESP32 Dev Module entry is the closest thing to a universal default for a standard ESP32 DevKit V1 board.
With the board selected, plug in the ESP32 and pick the matching entry under Tools > Port. Nothing showing up? That means it’s time to install the ESP32 USB driver, covered next.
Installing the ESP32 USB Driver (by Operating System)
Almost every ESP32 board talks to your computer through a CP210x or CH340 chip, and your OS may not have the matching ESP32 USB driver installed by default.
Download the CP210x or CH340 driver installer matching your board, run it, then unplug and reconnect. A restart is occasionally needed before the port appears.
Install the .pkg ESP32 USB driver package, then approve it under System Settings > Privacy & Security, since unsigned kernel extensions are blocked by default.
Most distros bundle these drivers already. If the port still won’t show, run sudo usermod -a -G dialout $USER and log out and back in. Some distributions use uucp instead of dialout.
Confirming the ESP32 Arduino IDE Setup Works: The Blink Test
Before starting your own project, run this sanity check to confirm the ESP32 URL for Arduino IDE, the package, and the drivers are all working together:
- File > Examples > 01.Basics > Blink
- Click Upload
- Watch the console at the bottom for compile and upload progress
- A blinking onboard LED confirms the entire Arduino IDE ESP32 installation succeeded
Not every ESP32 board wires its onboard LED to the same GPIO pin, so Blink can appear to “do nothing” on some boards even after a successful upload. Check your board’s pinout for the correct LED pin, update LED_BUILTIN, and re-upload if that happens.
Fixing Common Problems After Arduino IDE ESP32 Installation
“Failed to connect to ESP32: Timed out waiting for packet header”
This means the board wasn’t in bootloader mode when the IDE tried to talk to it, it isn’t related to the ESP32 board manager URL itself.
1. Hold the BOOT Button
Press and hold the physical BOOT button on your ESP32 board before initiating the upload process.
2. Click Upload
Click the Upload button in the Arduino IDE to compile and start sending your sketch to the board.
3. Release BOOT Button
Release the BOOT button the exact moment you see “Connecting…” appear in the Arduino IDE console.
4. Wait for Completion
Wait until the console displays “Done Uploading” to confirm the firmware has been successfully flashed.
Some boards need this button routine on every upload; press EN afterward to reboot and run your sketch.
No COM port shows up at all
Usually a missing ESP32 USB driver, not a URL problem. Reinstall the matching CP210x or CH340 driver, then try a different USB cable, charge-only cables are a common, overlooked culprit.
Boards Manager can’t find ESP32 after adding the URL
Check the Additional Board Manager URLs field for a stray space or typo, confirm your internet connection, and restart the IDE. Corporate or school networks sometimes block GitHub’s raw content domain, which silently prevents the ESP32 board package URL from loading.
Errors right after installing the package
The download likely got interrupted. Open Boards Manager, find ESP32, click Remove, then reinstall for a clean re-download of the Espressif Arduino Core.
Multiple similar ESP32 board names in the dropdown
Espressif’s package covers many variants (original ESP32, S2, S3, C3, C6). Match the name printed on your board rather than guessing.
ESP32 Arduino IDE Setup Checklist
Use this quick recap any time you need to install ESP32 in Arduino IDE on a new machine, or to walk through the full arduino ide esp32 installation again from scratch:
Verify Arduino IDE Installation
Confirm Arduino IDE is installed before you try to install ESP32 in Arduino IDE.
Add Board Manager URL
Open Arduino IDE Preferences and paste the ESP32 board package URL into Additional Boards Manager URLs.
Install via Board Manager
Open the Arduino Board Manager and search “esp32” to complete the esp32 arduino ide setup.
Select Correct Board Variant
Select the correct ESP32 Dev Module (or S3/C3 variant) for your ESP32 WROOM 32 or ESP32 DevKit V1 board.
Install USB Drivers
Install the matching ESP32 USB driver if the port doesn’t appear.
Run Blink Example
Run the Blink example to confirm the arduino ide esp32 installation was successful.
Verify Preferences Configuration
Double-check Arduino IDE Preferences still shows the official ESP32 board manager URL if anything stops working later.
Keep Core Index Updated
Remember that package_esp32_index.json is what keeps the Espressif Arduino Core and ESP32 Dev Module list current.
Bookmark this checklist, it covers every step needed to install esp32 in arduino ide again on a second computer without re-reading the whole guide.
Key Terms Explained
A quick glossary of the terms used throughout this esp32 arduino ide setup guide, since a few of them get used interchangeably:
Arduino Board Manager, the built-in Arduino IDE tool that reads board index files (like the ESP32 board package URL) and lets you install or update third-party hardware support such as the ESP32. Every time you install ESP32 in Arduino IDE, you’re really just feeding a new link to the Arduino Board Manager.
Additional Boards Manager URLs, the exact preferences field where the official ESP32 board manager URL gets pasted; also written as “Additional Board Manager URLs” depending on the IDE version. This is the one field that makes or breaks the entire arduino ide esp32 installation.
Official ESP32 Board Manager URL, the specific link (package_esp32_index.json) hosted by Espressif that the Arduino Board Manager needs in order to install esp32 in arduino ide correctly. Without the official ESP32 board manager URL entered exactly as shown, the esp32 arduino ide setup simply won’t proceed.
package_esp32_index.json, the actual JSON file behind the official ESP32 board manager URL; it lists every board definition and toolchain version in the Espressif Arduino Core. Anytime the Arduino Board Manager refreshes, it’s re-reading this same package_esp32_index.json file.
Espressif Arduino Core, the full toolchain (compiler, upload tools, board definitions) that gets installed once the ESP32 board package URL has been added and the package is installed through the Arduino Board Manager. Updates to the Espressif Arduino Core happen through the same screen you used to first install ESP32 in Arduino IDE.
ESP32 Dev Module, the generic board entry most people select after installing the Espressif Arduino Core, suitable for a standard ESP32 WROOM 32 or ESP32 DevKit V1. If you’re ever unsure which entry to pick during your esp32 arduino ide setup, ESP32 Dev Module is the safest default.
ESP32 DevKit V1, one of the most common ESP32 development boards, fully supported once you install ESP32 in Arduino IDE using the steps above. Most ESP32 DevKit V1 boards use the ESP32 Dev Module entry and a CP210x ESP32 USB driver.
ESP32 WROOM 32, the module found on most ESP32 DevKit V1 boards and many other ESP32 dev kits, selected as “ESP32 Dev Module” in the Arduino Board Manager. Confirming you have an ESP32 WROOM 32 module makes the rest of the arduino ide esp32 installation predictable.
ESP32 USB Driver, the CP210x or CH340 driver your operating system needs so the ESP32 DevKit V1 or ESP32 WROOM 32 board shows up as a serial port after the esp32 arduino ide setup is complete. No ESP32 USB driver means no port, no matter how correctly the ESP32 board package URL was entered.
Arduino IDE Preferences, the dialog (File > Preferences) where the Additional Boards Manager URLs field lives, and where the entire ESP32 URL for Arduino IDE setup begins. Bookmark the Arduino IDE Preferences screen, you’ll return to it any time you install ESP32 in Arduino IDE on a new machine, whether you’re configuring the Arduino Board Manager for an ESP32 WROOM 32, an ESP32 DevKit V1, or checking that package_esp32_index.json and the Espressif Arduino Core are still up to date.
Quick Answers to Common Questions
1. What is the official ESP32 Board Manager URL for Arduino IDE?
↑2. Where do I paste the ESP32 Board Manager URL in Arduino IDE?
↓3. Can I add both ESP32 and ESP8266 Board Manager URLs together?
↓ESP32:
https://raw.githubusercontent.com/espressif/arduino-esp32/gh-pages/package_esp32_index.json
ESP8266:
http://arduino.esp8266.com/stable/package_esp8266com_index.json
Separate them with a comma or place each on a new line, depending on your Arduino IDE version.
4. Why is the ESP32 Board Manager URL not working?
↓5. Do I need to download the JSON file manually?
↓6. Is the raw.githubusercontent.com URL the official ESP32 package source?
↓Wrapping Up
Once the ESP32 URL for Arduino IDE is saved, the package is installed, and Blink is running, your Arduino IDE ESP32 installation is complete on Windows, macOS, or Linux alike, ready for whatever you build next on your ESP32 WROOM 32, ESP32 DevKit V1, or newer board variant.
Get a Quote